Listen to events in LeanIX using webhooks.
Overview
Webhooks let you receive updates about events as they happen in near real time in LeanIX. With webhooks, you can set up event-driven triggers that initiate automated actions, which allows you to automate workflows for your organization and eliminate manual processes.
We support the following webhook types, based on the event delivery method:
- PUSH webhooks: As events occur in LeanIX, they're sent through HTTP POST requests to the specified target URL. This is the recommended way to receive events from LeanIX.
- PULL webhooks: A client requests events by polling a REST endpoint on the LeanIX API. This method of retrieving events is useful if your environment doesn't allow exposing a public HTTP server to receive events, such as when your application operates behind a firewall. Events are retained on the server for 30 days, but it's recommended to retrieve them more regularly.
The following image illustrates how PUSH and PULL webhooks work.
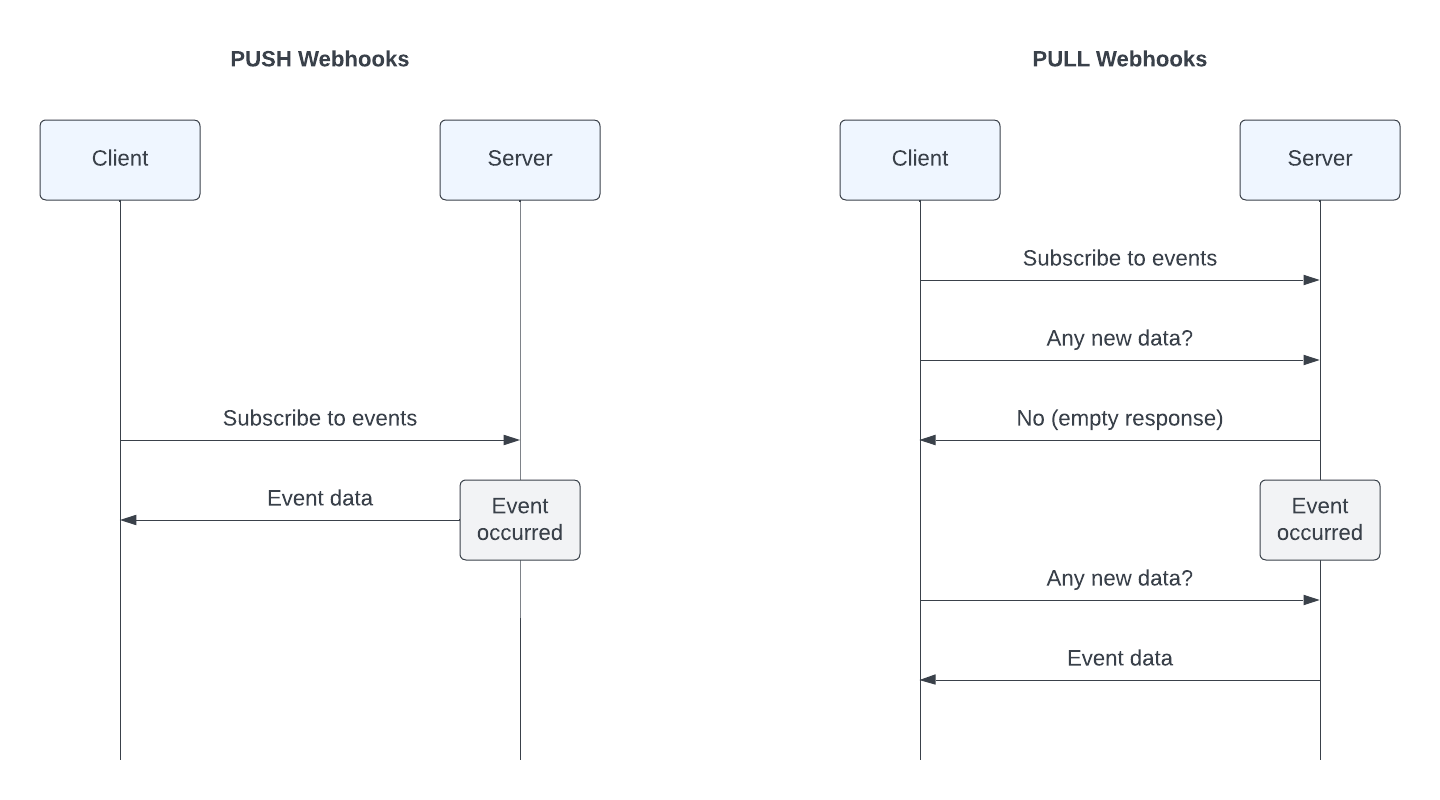
Workflows for Data Retrieval Using PUSH and PULL Webhooks
Note
Within the Webhooks API, webhooks are referred to as subscriptions. This term is also used in the application UI and this document.
Creating a Webhook
As an administrator, you can create, update, and delete webhooks.
To create a webhook, follow these steps:
- In the user profile menu, select Administration, then select Webhooks in the sidebar.
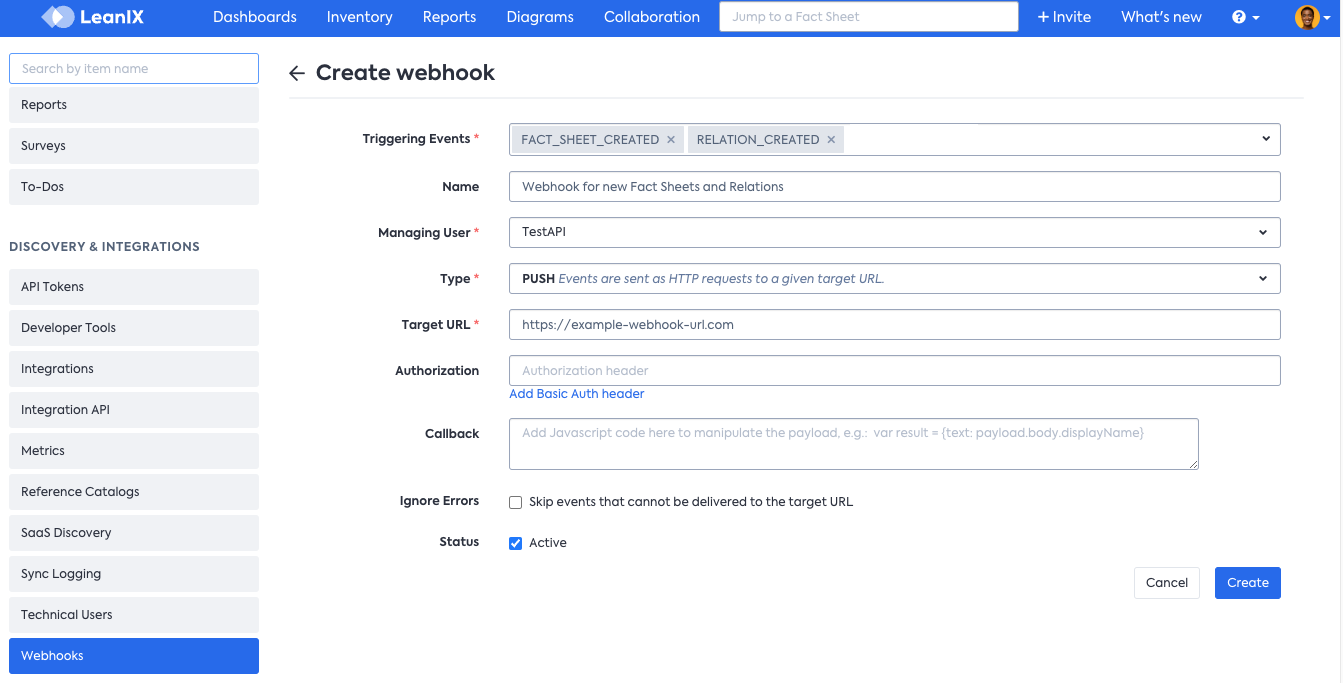
- Click New Webhook. A page for configuring a webhook opens.
- Select triggering events for the webhook. For a full list of events, see Webhook Events.
- Optional: Enter a name for the webhook.
- Select a managing user for the webhook. We recommend selecting a Technical User.
- Select the delivery type and configure relevant parameters:
- PUSH: Enter a target URL for delivering events. Optionally, add an Authorization header, enter a callback to manipulate the webhook payload, and decide whether you want to skip events that cannot be delivered. For more information, see Using PUSH Webhooks.
- PULL: Optionally, adjust the maximum batch size that defines a soft upper limit for data in event batches. To learn how to fetch events, see Using PULL Webhooks.
- Decide whether you want to activate the webhook after creation by selecting or clearing the Active checkbox next to Status.
- Click Create.
A webhook is created. You can update or delete the webhook if needed.
Creating a PUSH Webhook
Event Types and Payloads
For a full list of available event types, see Webhook Events.
To view example payloads for selected event types, see Example Webhook Payloads.
Using PUSH Webhooks
With PUSH webhooks, every time an event occurs in LeanIX, it's sent to the specified target URL through an HTTP POST request. The request body contains an event payload in JSON format.
Your server should return a successful HTTP response code to confirm successful delivery. Delivery results for the past 30 days are listed on the webhook details page, below the configuration fields.
Tip
Before configuring automations with a PUSH webhook, verify the webhook configuration using a test target URL. You can use an online testing tool such as Webhook.site.
Managing Security for PUSH Webhooks
We support the HTTPS protocol for the target URL. Ensure to keep your target URL private.
You can protect your webhook URL in the following ways:
- Use the Authorization header. In the webhook configuration, specify credentials required for Basic authorization.
- Append a token to the query string of the target URL.
Error Handling
If event delivery fails, retries occur every 50 seconds until successful. Delivery may fail in the following cases:
- The target URL is unreachable or is improperly configured.
- The client returns a non-successful HTTP response code.
To skip events that cannot be delivered to the target URL, select the Ignore Errors option in the webhook configuration. With this option enabled, delivery retries do not occur.
Automatic Deactivation of PUSH Webhooks
Webhooks that have an unreachable target URL or respond with a non-successful HTTP status code for more than 10 days are automatically deactivated. An administrator needs to reactivate the webhook manually once the target URL becomes valid. To reactivate a webhook, in the webhook configuration, set the status to Active.
Manipulating the Webhook Payload Using a Callback
To manipulate the webhook payload before it's sent out to the target URL, you can define a callback using JavaScript code.
Note
LeanIX webhooks use the Nashorn JavaScript engine version 15.4. It is compatible with ECMAScript version 5.1 and many features from ECMAScript version 6. To learn more, see the Nashorn Engine documentation.
Within the JavaScript code, the object delivery is available within the global scope. It has, among others, the following properties: payload, targetMethod, and targetUrl. You can modify these properties right from your code.
var payload = delivery.payload;

delivery.targetMethod = 'POST';
delivery.targetUrl = delivery.targetUrl += '?test=1';

delivery.payload = {
  text : 'Hello World'
};
A common manipulation is restricting a webhook to only a single fact sheet type. For example, to trigger a webhook only for application fact sheets, use the following callback:
delivery.active = false;

if (delivery.payload.factSheet.type == 'Application' ) {
   delivery.active = true;
}
To optimize performance, we cache the evaluation context of your webhook's callback for a period of five seconds. Ensure proper initialization of new variables to avoid retaining values assigned from previous executions of your webhook.
Using PULL Webhooks
With PULL webhooks, a client requests events by polling an endpoint on the LeanIX Webhooks API.
When configuring a PULL webhook, you can optionally adjust the maximum batch size that defines a soft upper limit for data in each event batch. The default maxBatchSize value is 512 KB. Usually, batches don't exceed the specified size limit. However, a single event exceeding this limit will still be delivered.
Intended Usage
PULL webhooks are intended to be used in a loop:
- Make a request to retrieve some events.
- Process events.
- On success, make a request to advance the cursor or use the
autoCommitoption. - Repeat the above steps.
Concurrency
While we detect and reject processing of concurrent requests to the same subscription id, you should ensure that only one client uses the same webhook. Create one PULL webhook per client.
Event Availability
Events are retained on the server for 30 days. After this period, they are not available for retrieval.
Automatic Deactivation of PULL Webhooks
After 30 days of inactivity (no pulls or commits), a PULL webhook is automatically deactivated. To reactivate a webhook, in the webhook configuration, set the status to Active.
Retrieving Events
Before you start, ensure that you know how to authenticate to LeanIX APIs. To learn more, see Authentication to LeanIX Services.
To retrieve events, make a GET request to the following endpoint:
https://{SUBDOMAIN}.leanix.net/services/webhooks/v1/subscriptions/{id}/events
To get the subscription id, navigate to the webhook details page.
Example request:
curl --request GET \
  --url https://{SUBDOMAIN}.leanix.net/services/webhooks/v1/subscriptions/888eaaf3-c72f-411c-a78a-d382ba9b2f75/events \
  --header 'Authorization: Bearer {ACCESS_TOKEN}'
Example response:
{
  "status": "OK",
  "type": "PullResult",
  "errors": [],
  "total": 3,
  "data": {
    "events": [
      {
        "cursor": {
          "offset": 178
        },
        "event": {...}
      },
      {
        "cursor": {
          "offset": 179
        },
        "event": {...}
      }
    ],
    "nextCursor": {
      "offset": 182
    }
  }
}
The event object contains the webhook payload. Additionally, each event is annotated with the cursor attribute that can be used later to navigate to this event. The nextCursor attribute applies to the entire batch of events.
If there are no new events, an empty response is returned.
Moving the Cursor
Once you have successfully retrieved and processed a batch of events, you need to move the cursor forward to get the next batch. Otherwise, the next GET request would return the same events as in the previous response. This ensures that even if your application is temporarily malfunctioning, it will eventually receive all events.
To move the cursor to the next given nextCursor, make a PUT request to the following endpoint:
https://{SUBDOMAIN}.leanix.net/services/webhooks/v1/subscriptions/{id}/cursor
Example request:
curl --request PUT \
  --url https://{SUBDOMAIN}.leanix.net/services/webhooks/v1/subscriptions/888eaaf3-c72f-411c-a78a-d382ba9b2f75/cursor \
  --header 'Authorization: Bearer {ACCESS_TOKEN}' \
  --header 'Content-Type: application/json' \
  --data '{"offset": 182}'
Alternatively, you can move the cursor forward automatically when retrieving events. To enable this behavior, add autoCommit=true as a query string parameter to the /services/webhooks/v1/subscriptions/{id}/events endpoint. Enabling automated commits does not guarantee that all events will be successfully received and processed by your application due to possible network issues or other problems.
Example request:
curl --request GET \
  --url https://{SUBDOMAIN}.leanix.net/services/webhooks/v1/subscriptions/888eaaf3-c72f-411c-a78a-d382ba9b2f75/events?autoCommit=true \
  --header 'Authorization: Bearer {ACCESS_TOKEN}'